Showing posts with label easy. Show all posts

Monday, September 7, 2015

Easy Tunic Toddler Dress (with mini tutorial)

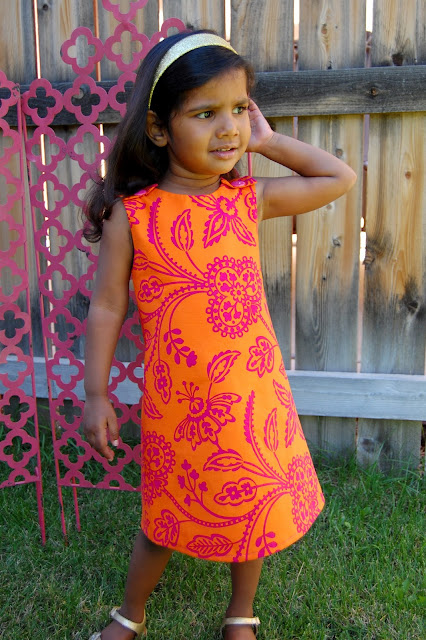
We just celebrated having A home with us for one whole year!  I (finally!) got around to making her a new dress for her Gotcha Day.

 I used a fuchsia and orange version of Garden Party by Pillow and Maxfield for Michael Miller for the fabric.  I picked this up at my local quilt store several years ago, so it would be hard to find now.  I was looking for fabric that was bright and Indian-ish for my daughter who was still living in India at the time.  I used some of this for her blocks and her quilt, but since I had several yards I knew I wanted to make a dress out of it. 
 
Step 1: Cut out the fabric.  I used a couple of dresses she is currently wearing as pattern guides.  This is the back of the tunic so the straps are longer to come up over the shoulders.  I didn't want to have to finish the lining on the upper part of the dress so I cut it to use the selvage edge.  The lining on this side is crooked, but you can't see that on the finished dress so I left it like this.


The front panel of the tunic, again using the selvage edge for the lining.  Lining the top gives a little body to the neck and arm holes.


Step two: Sew linings to the pieces.

Make sure to cut your edges to ease the seams around curves like the neck and arm openings.

The following steps don't have pictures... I was trying to rush and finish the entire dress while A was napping!
Step 3: Turn the pieces right side out and press with iron.
Step 4: Sew the front and back pieces together along the sides.  I used French seams so I didn't have to finish anything on the inside of the dress.  I love French seams and on something like this they are so easy!
Step 5: Hem bottom of dress.  Press with iron to finish.
Step 6: Add buttons to top of dress.  I sewed buttons on the front piece and added button holes to the straps, but you could do it the other way around for a slightly different look.

Finished product!  My machine was very cooperative for this project so I was able to finish quickly, about two hours start to finish.  I think this is a record for me- sewing projects, even easy ones like this, tend to drag on for me as I am constantly ripping out seams and re-sewing. 

A loves her Gotcha Day dress!  Having the most beautiful model makes my sewing look good!!!

Friday, October 31, 2014

Halloween Treats

Happy Halloween Folks!

The kids always get plenty of sweets tonight so I like to give out something without sugar to their classmates.  This year we did glow sticks!  D helped me design these cute cards, then colored them in by herself. The font is MTF Sweet Halloween Dings.  Her fonts are the cutest!

My crafty girl cut them all out and punched them, too.

Then we attached them to the glow sticks.

I's chalkboard style cards for this year.

Sunday, October 26, 2014

Woodland Tooth Fairy Pillow

D came home with a missing tooth recently!  I was planning on whipping up her tooth fairy pillow when her first tooth got loose, so I was a bit unprepared by her sudden lost tooth.  Thankfully the Tooth Fairy held off visiting D until I was able to get around to making her pillow.  Here's how it turned out.
I had been saving this fabric for something fun.  A tooth fairy pillow fits the bill, don't you think?  The small pocket in the front is for her tooth...

A little simple embroidery for her name...

A larger pocket on the back side so the Tooth Fairy can leave her receipt...

Now we are ready for the rest of her teeth to come out!

Saturday, August 2, 2014

Paint Chip Wall Art

Our entryway gets a lot of intense afternoon sun and the artwork I hung up here eight years ago is super faded.  I suddenly decided I needed something cheap, easy, and fast to replace my faded print- enter paint chip wall art.
 
I did have to purchase the frame- you can't go wrong with IKEA (unless you are trying to replace kitchen cabinet hinges, but that is another story!)

Why do I have hundreds of paint chips in a shoe box?  Doesn't everyone?  Mysteries if the universe.  I had plenty of samples on hand to fill my fairly large frame.  Most of them came from when I was trying to pick a new front door color, so the colors work well in the entryway.
A paper cutter makes quick work of turning the paint chips into parallelograms-  a lot of them.  I just used a glue stick to glue them to the paper that came with the frame.
 
Insert into frame.  Done.  Not as easy as just framing a poster, but pretty easy.  I was not very precise while cutting my shapes out and the end product is more sloppy than I hoped.  Not bad from far away, but up close I want it to look cleaner.  I might redo this project... someday.  Also, I hung it on the nail from the previous artwork and I think it needs to be moved, but for now it will live here just fine.

Thursday, June 12, 2014

Homemade Sidewalk Chalk Paint

We are having a mellow summer this year, but D has big plans for all the crafty things she wants to do.  First up is chalk paints.  Her teacher filled me in on an easy, homemade version- cornstarch, water and food coloring.  I'm guessing there are actual "recipes" all over Pinterest.  These took about five minutes to mix up- she's been painting the driveway for days!


Saturday, January 25, 2014

Thankful Tree #2

I posted about our Thankful Tree last year here.  We had fun doing it again this year.  This is how the tree turned out this time...

To preserve our thankfulness I pulled all of the words off the leaves and stuck them to a piece of card stock as a simple collage.  Now we can keep them from year to year.  It was fun to see what had changed in a year's time and what had stayed the same.  We certainly have so many things to be thankful for!

Football Birthday Party

We have been enjoying a great football season this year, so it was no surprise when my oldest asked for a football party for his eighth birthday.
Invites: 

"Thanks for coming to my party" cups.  It helped a lot to do this party during football season- I was able to source most things at Wal-mart.  Like these plastic party cups.  The flame footballs came from Oriental Trading.  Personalized name pennants were made from scrapbook papers and attached to glow sticks.  The cups also held football playing cards I "scored" in the Target dollar section, Denver Bronco tattoos from Bed, Bath and Beyond,  and foil wrapped chocolate footballs.
 

The spread:  I started with generic football colors green, white and brown, but used plenty of blue and orange because we are Broncos fans around here!

Plates, napkins, paper bowls, cupcake wrappers all from Wal-mart...


I used a football themed card stock sticker pack from my local scrapbook store to dress up the cupcakes and individual cake for I...
 

Yum! Chocolate covered strawberry footballs.  I think I ate half of these by myself...
 

We served store-bought pre-made cheese pizzas and added pepperoni footballs before baking...
 
 Soup cans covered with scrapbook paper for utensil holders...
 
Plastic yard line bunting and table cloths were all from Wal-mart.  I pulled anything football related from I's room for the party including this ceramic piggy bank (I think this was another Target dollar section find) and I displayed his new Broncos poster...


We were hoping to spend most of the party playing football outside, but it was snowing the day of the party. :(  So we ended up in the garage again.  My husband kept the kids entertained by making a quick  football obstacle course- run through the tires, tackle the punching bag, catch a perfectly thrown spiral.  All the kids got to put their Peyton Manning skills to test trying to throw through shapes cut out of a tarp.  I also broke down and bought a helmet shaped pinata from Target.  And I vowed No Pinatas! this year.
Disclaimer #1- my garage is never this clean...
 
 
Disclaimer #2- I have told my daughter that the orange and white skirt goes with her blue Bronco jersey, not the pink shirt.  And nothing goes with purple Crocs and black socks.  She just likes to do her own thing.

 
So football fun was had by all, even in the garage.  And our Broncos are heading to the SUPERBOWL (woo-hoo!!) so I am recycling everything for our Superbowl party. Yah!
Related Posts Plugin for WordPress, Blogger...