Showing posts with label baby. Show all posts

Monday, September 7, 2015

Easy Tunic Toddler Dress (with mini tutorial)

We just celebrated having A home with us for one whole year!  I (finally!) got around to making her a new dress for her Gotcha Day.

 I used a fuchsia and orange version of Garden Party by Pillow and Maxfield for Michael Miller for the fabric.  I picked this up at my local quilt store several years ago, so it would be hard to find now.  I was looking for fabric that was bright and Indian-ish for my daughter who was still living in India at the time.  I used some of this for her blocks and her quilt, but since I had several yards I knew I wanted to make a dress out of it. 
 
Step 1: Cut out the fabric.  I used a couple of dresses she is currently wearing as pattern guides.  This is the back of the tunic so the straps are longer to come up over the shoulders.  I didn't want to have to finish the lining on the upper part of the dress so I cut it to use the selvage edge.  The lining on this side is crooked, but you can't see that on the finished dress so I left it like this.


The front panel of the tunic, again using the selvage edge for the lining.  Lining the top gives a little body to the neck and arm holes.


Step two: Sew linings to the pieces.

Make sure to cut your edges to ease the seams around curves like the neck and arm openings.

The following steps don't have pictures... I was trying to rush and finish the entire dress while A was napping!
Step 3: Turn the pieces right side out and press with iron.
Step 4: Sew the front and back pieces together along the sides.  I used French seams so I didn't have to finish anything on the inside of the dress.  I love French seams and on something like this they are so easy!
Step 5: Hem bottom of dress.  Press with iron to finish.
Step 6: Add buttons to top of dress.  I sewed buttons on the front piece and added button holes to the straps, but you could do it the other way around for a slightly different look.

Finished product!  My machine was very cooperative for this project so I was able to finish quickly, about two hours start to finish.  I think this is a record for me- sewing projects, even easy ones like this, tend to drag on for me as I am constantly ripping out seams and re-sewing. 

A loves her Gotcha Day dress!  Having the most beautiful model makes my sewing look good!!!

Monday, August 3, 2015

Whole Cloth Elephant Quilt

I have wanted to try quilting for years but always put it off thinking it's too involved for my short attention span crafting style.  I finally took the plunge with this whole cloth elephant quilt!

I love the elephants in this fabric (Madhuri Elephant by The Quilted Fish for Riley Blake) and couldn't bear to cut it up so a whole cloth quilt was an easy solution.  I made this for my daughter who was born in India, so the fabric is obviously a nod to her home country.  I'm really pushing the elephant theme for her, so I hope she likes them!
 
Everything I know about quilting I've learned from reading fiction books with characters who quilt, so not that much.  I learned a bit about Hawaiian whole cloth quilts reading The Aloha Quilt by Jennifer Chiaverini and was also inspired by looking at kantha quilts (blankets made from old saris or sari fabric) on-line.  I knew I wanted to quilt by hand not machine and finally found this tutorial as a guide. 
 
I mostly used supplies I had on hand instead of buying all new quilt specific tools - I used an embroidery hoop instead of a quilt hoop and normal thread and needle for the basting.  I did buy hand quilting thread and needles for the swirling design.  I have tried using a thimble several times, but I find it to be more of a hassle than helpful.
 
I drew the swirling design freehand with a water soluble marker.  My favorite part was spraying down the quilt with water and watching the blue ink disappear.  Since my thread was the same color as the background of the fabric the quilting still looks subtle even with an intricate design.

I only quilted the background so the elephants stand our a bit because of the batting layer.

 
To be honest, I was going to ask my mom to do the binding for me.  It involves all the parts of sewing I don't like: measuring, ironing, being precise.  I ended up giving it a try on my own and I think it turned out okay.  It's a little wonky in places but that adds to the handmadeness, right?
 
A loves her special elephant quilt!

Tuesday, July 8, 2014

Mendhi Style Name Sign

I finally finished A's sign to hang over the crib- yeah! It was not a total disaster!  Although I think of myself as pretty crafty, I'm not much of an artist and I'd usually consider something like this beyond my abilities.  I'm so proud of how it turned out.
 
I bought a wooden sign from Hobby Lobby and painted over the existing artwork with dark brown craft paint.  Next I sketched out the letters with a pencil and then drew over the pencil marks with a white paint pen (extra fine point).  I free handed the mendhi "extras" and the interior of the letters.  My mistakes ( and there were a lot) I had to paint over with brown and then I tried again with the paint pen.  A little painstaking, but I like the results!


I mostly used books to practice drawing mendhi (or mehndi, or henna, etc) style designs.  I haven't tried anything with actual henna on the skin, but hopefully that's my next step.  I hope my girls let me practice on them!

This book was great in that it started out really simple, then worked up to recreating designs.  The left page is the example and the right side is my attempt to copy it.

The sign is hanging over her crib with the gold foil India silhouette I bought and a piece of the elephant fabric that I love.


I am ready for my little girl to come home!  We've had a set back with our travel plans, but are still hoping we will be traveling soon and A will be sleeping in this crib before long!


Thursday, March 24, 2011

Baby Bike Bib

Surprise! I made something! This stage of life with the kids is making it nearly impossible to spend time crafting, hence the lack of posting as of late. I did manage this cute bib for M out of necessity- all my messy food bibs are pink. I used a laminated cotton so it wipes off easily after feeding. Even after doing some research online I still had a difficult time sewing with the fabric. Anyone have any pointers? I still have some fabric left and am hoping to make a couple more bibs, then I am moving on to art smocks made from oilcloth.

Monday, February 14, 2011

Handmade Valentine Gifts

I couldn't get it together to do much for Valentine's Day this year, but my mom made wonderful handmade gifts for the kids this year. She is amazing!
This is a felt "Lightning McQueen" for my Cars crazy oldest. Awesome! She is thinking about trying to sell plush felt cars and trucks on etsy. What do you think? I think they would be a hit!Knit pink bear for D. She named her Ruby.And a hanging triangle toy for baby M. It has ribbons and plastic toys dangling and batting.

My kids were thrilled! We've been playing with them all week.

Thursday, January 27, 2011

Piggy Bank Personalization

Another project moved off my desk! I've had this ceramic bank (from Hobby Lobby) for baby M sitting on my desk for awhile. I've been waiting for inspiration on how to personalize it for M, then I got a Cricut machine for Christmas! As I have mentioned, I'm not a big scrapbooker, but the Cricut machine is really neat. My thought was to cut out shapes from adhesive backed vinyl using my new machine. Then I realized I'd have to buy the vinyl. Right now my craft budget is $0 until I get rid of or use up some of my supplies. So I dug through my stickers and found some green and brown flocked alphabet stickers. This is the result. Don't worry about my new little machine. I'm hoping to use it to make baby announcements sometime soon. Other Cricut projects to follow...

Tuesday, January 25, 2011

Baby Books

With it being January, I am feeling the need to organize, organize, organize! We'll see just how much I get done with the three little ones. My crafting space is in constant need of serious de-cluttering, so cleaning it up is taking up most of my crafting time right now. My first step is to finish all the unfinished projects littered everywhere. One of those projects is my kids' baby books.
I'm not much of a scrapbooker, so I was looking for pretty, modern, reasonably priced fill in the blank books for recording memories. Here's was I ended up with:
This is the book I bought for my first son. It is very simple and works well for a girl or a boy. You can find it here and here. I also bought an adoption book from this company for a friend that I thought was cute, but I'm not sure if they make it anymore.
Here is my daughter's baby book. The cover is very simple ( just solid violet with a slot for a picture) but I LOVE the illustrations and prints inside. You can also buy extra pages if you are ambitious. This book is beautiful! You can find it here. Oh yeah- they carry a blue one for boys, too.Here is the one I bought for our third child. It is SO cute! I didn't know if we were having a boy or girl, so the little birds fit the bill. It is very simple, just right for a third baby (they kind of get the short end of the stick when it comes to documenting every little thing don't they?) It comes in a beautiful box with a little drawer for mementos. You can find it here and here.This is the book I'd buy if I wanted to spend about $100. It is gorgeous! You can find it here

Friday, January 7, 2011

Crotcheted Owl Hat for Baby (and other knit projects)

Winter makes me want to knit and crotchet and make fun snugly things. It has been REALLY cold here, so these projects for the kids were born. I took apart some old hats and scarves I made several years ago that I never really wore and used the yarn again.
Owl beanie for M-
I needed something without a pom-pom on top because those hats always side down over his eyes in the car seat. This started out at a regular hat and then I decided to add the owl. He's a little lopsided- I think it adds to the handmade-ness: Pink knit scarf with pinwheel flowers for D-
I really am not much of a knitter, but scarves are fun and easy. She needed something to keep her neck warm when I pulled her crazy hair up:Knit hat for I-
I don't really like the way this turned out, so I will probably pull it out and start over again. He has been asking for a Broncos hat and, really, what am I going to do with blue and orange yarn?

Thursday, December 16, 2010

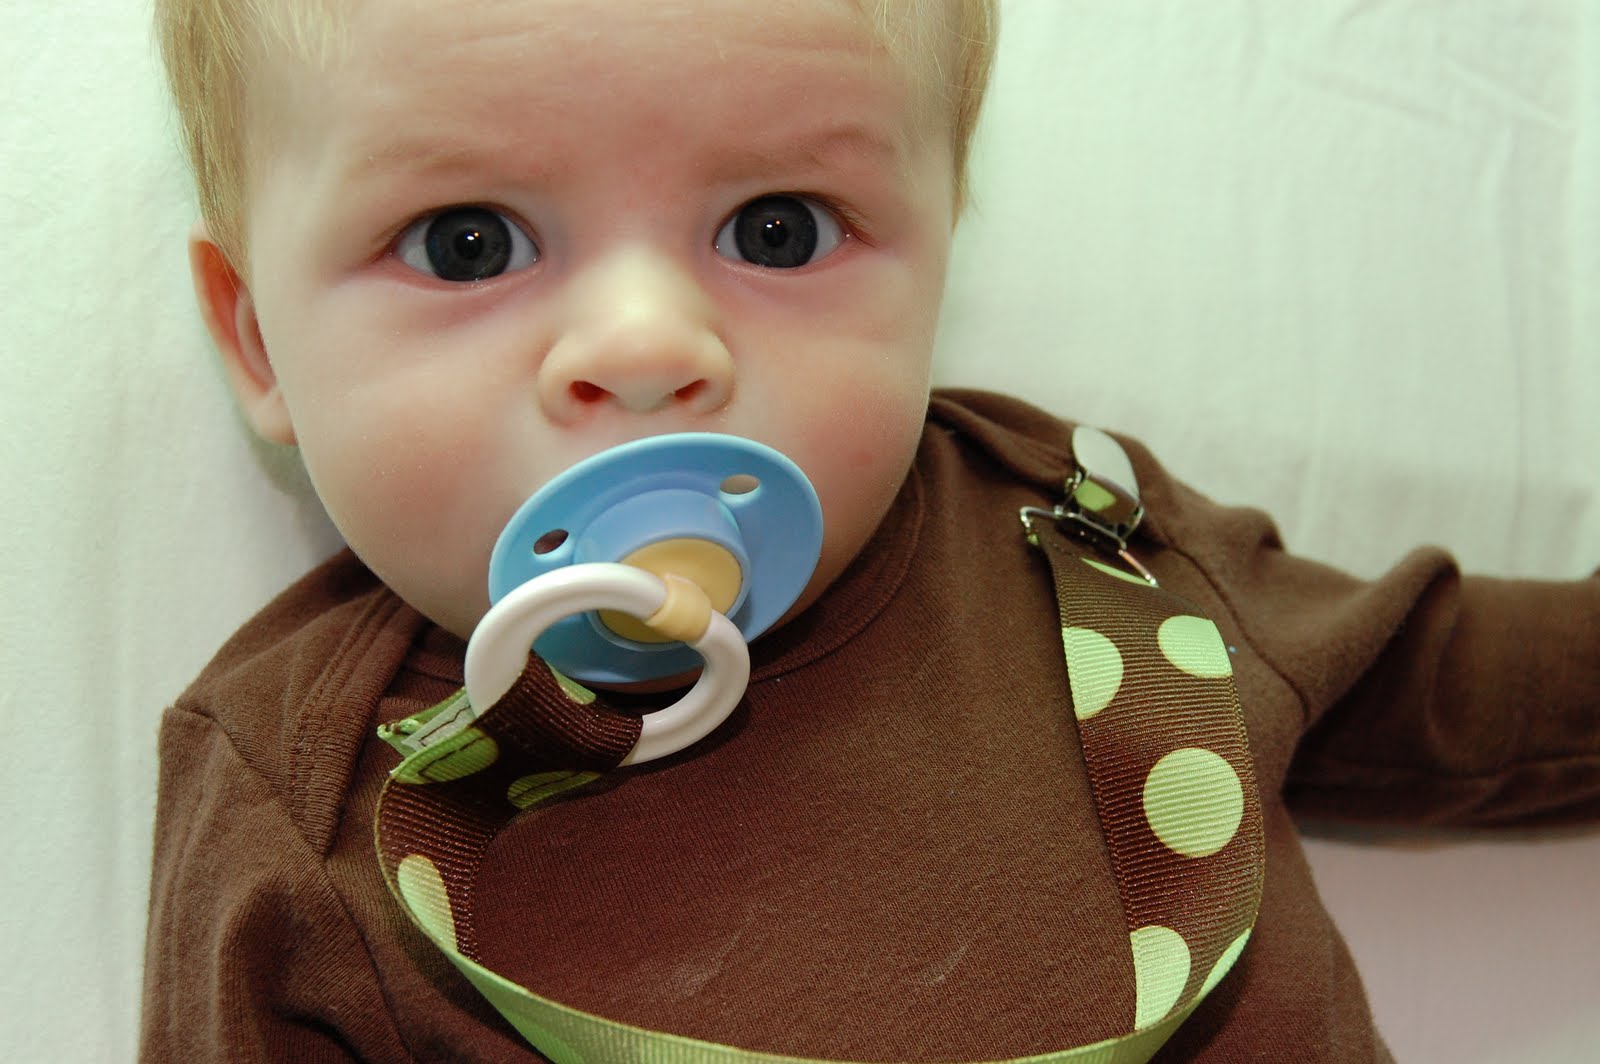
Pacifier Clip Tutorial

These are so easy, you could whip up a bunch really quick.
1. You need one suspender clip, a bit of Velcro, and a length of ribbon. I got this grosgrain ribbon at Hobby Lobby- brown with green dots on one side, plain green on the other. I cut my ribbon to 12 1/2 inches...2. Tucking in the raw edge, I sewed one end to the suspender clip using a straight stitch. you could use a sewing machine, but I think hand sewing is just as fast if not faster...3. I finished off the other end the same way- folding twice to cover up the raw edge...4. Sew bits of Velcro onto the ribbon using a straight stitch...5. And that's it! No more picking up pacifiers off the floor every two seconds. Hooray!
Related Posts Plugin for WordPress, Blogger...