Tuesday, November 3, 2009

Clothespin Cake Topper

After seeing some clothespin cake toppers online (at homemade by Jill here and lollipop workshop here) I had to have one for D's birthday. My mom did all the hard work- painting the face, making hair out of embroidery floss and creating the arms. I basically just dressed her. I think it looks just like D- before I cut her bangs, of course.

Felt Crown

I wish I could claim this handiwork as my own, but all the credit goes to my mom. This is the felt crown she made for D for her birthday. This is adorable!

Monday, November 2, 2009

Little Fleece Vest

Little vest I made for D to wear this fall. Unfortunately she hates it and has only put it on twice for about 2 minutes each time. Several times I've asked her to put it on and she just runs away screaming. Apparently we are not a vest family. I thought it would be a quick, easy, and cheap project. Cheap-yes (the fleece was super cheap at Wal-Mart). Quick & easy-not quite. Using a pattern would have helped a lot. Buying the right zipper would have helped, too. In the end I just finished it without a zipper or pockets. Probably not worth all the effort considering she does NOT want to wear it. Now I am looking for a project for the yard of pink fleece I have left.

Here she is posing for a catalog- hand in pockets. ANTM here we come!

Cord Skirt for Mom

These pants were too short, so I've been wanting to recycle them. I tried this skirt using the bottom of the legs as panels in the front and back. I think it turned out okay, but it still looks, well, recycled. Any thoughts?


Wednesday, September 30, 2009

Cord Skirt for Fall

I've been holding onto this fabric for awhile, wanting to do somthing fun for D with it. It's a baby wale corduroy, so a skirt for fall seemed appropriate. My first attempt ended up too long, so I had to chop off the top. The second try turned out much better.

Felt Barrette Cover Tutorial

So here's my first go at a tutorial. Let me know what you think!

Cut out all your pieces. You need a top, a bottom, and any embellishments.

Make sure your top and bottom pieces are the same size, slightly larger than your metal barrette. Attach embellishments using embroidery floss. I think the simpler the better, then your embellishments aren't getting in the way when you sew the cover together. (For this barrette I used French knots to attach the flowers.)
Cut your bottom piece in half where the barrette will hinge.
Using a running stitch, sew the longer bottom piece to the top piece. Make sure to hide your knot in between the top and bottom pieces for a clean look.
Once you have stitched all the way around the bigger bottom piece, reverse your running stitch to finish attaching the piece.
Slip your metal barrette between the top and bottom pieces.
Attach the smaller bottom piece using a running stitch.Pay close attention to to the top of the barrette so your running stitch misses your embellishments.
Finished piece from the bottom.
Finished piece from the top.


Happy crafting!

Tuesday, August 18, 2009

Craft Exchange

My friend Marci recently organized a craft exchange, and I was so excited to be included! It was fun to try to work on something I hoped my friend would enjoy- and super fun to get beautiful craft surprises in the mail. This is what I received from Riki (as you can see, the lady is TALENTED!)- perhaps the cutest purse ever...
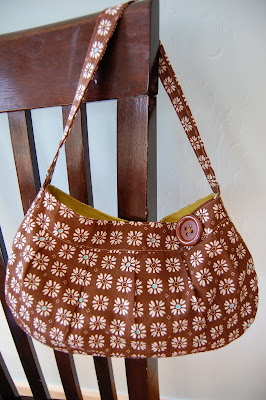
And a fabric bowl that goes great in my living room...

Thank you SO much, Riki. I LOVED everything!
This is what I made for Marci- a "Lickety Split" bag (find the Made by Rae pattern here) - book bag/ stroller bag/ reversible carry-all. I never did get a good picture before I wrapped it, but this gives you a taste of my handiwork.

Thanks for organizing this, Marci. I can't wait to do it again!

Related Posts Plugin for WordPress, Blogger...