Monday, September 7, 2015

Easy Tunic Toddler Dress (with mini tutorial)

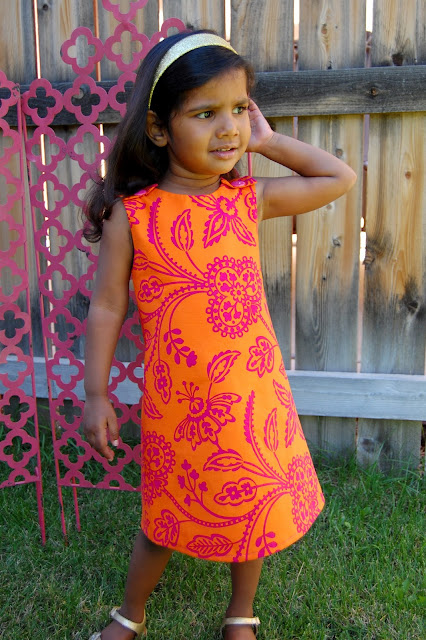
We just celebrated having A home with us for one whole year!  I (finally!) got around to making her a new dress for her Gotcha Day.

 I used a fuchsia and orange version of Garden Party by Pillow and Maxfield for Michael Miller for the fabric.  I picked this up at my local quilt store several years ago, so it would be hard to find now.  I was looking for fabric that was bright and Indian-ish for my daughter who was still living in India at the time.  I used some of this for her blocks and her quilt, but since I had several yards I knew I wanted to make a dress out of it. 
 
Step 1: Cut out the fabric.  I used a couple of dresses she is currently wearing as pattern guides.  This is the back of the tunic so the straps are longer to come up over the shoulders.  I didn't want to have to finish the lining on the upper part of the dress so I cut it to use the selvage edge.  The lining on this side is crooked, but you can't see that on the finished dress so I left it like this.


The front panel of the tunic, again using the selvage edge for the lining.  Lining the top gives a little body to the neck and arm holes.


Step two: Sew linings to the pieces.

Make sure to cut your edges to ease the seams around curves like the neck and arm openings.

The following steps don't have pictures... I was trying to rush and finish the entire dress while A was napping!
Step 3: Turn the pieces right side out and press with iron.
Step 4: Sew the front and back pieces together along the sides.  I used French seams so I didn't have to finish anything on the inside of the dress.  I love French seams and on something like this they are so easy!
Step 5: Hem bottom of dress.  Press with iron to finish.
Step 6: Add buttons to top of dress.  I sewed buttons on the front piece and added button holes to the straps, but you could do it the other way around for a slightly different look.

Finished product!  My machine was very cooperative for this project so I was able to finish quickly, about two hours start to finish.  I think this is a record for me- sewing projects, even easy ones like this, tend to drag on for me as I am constantly ripping out seams and re-sewing. 

A loves her Gotcha Day dress!  Having the most beautiful model makes my sewing look good!!!

Monday, August 3, 2015

Whole Cloth Elephant Quilt

I have wanted to try quilting for years but always put it off thinking it's too involved for my short attention span crafting style.  I finally took the plunge with this whole cloth elephant quilt!

I love the elephants in this fabric (Madhuri Elephant by The Quilted Fish for Riley Blake) and couldn't bear to cut it up so a whole cloth quilt was an easy solution.  I made this for my daughter who was born in India, so the fabric is obviously a nod to her home country.  I'm really pushing the elephant theme for her, so I hope she likes them!
 
Everything I know about quilting I've learned from reading fiction books with characters who quilt, so not that much.  I learned a bit about Hawaiian whole cloth quilts reading The Aloha Quilt by Jennifer Chiaverini and was also inspired by looking at kantha quilts (blankets made from old saris or sari fabric) on-line.  I knew I wanted to quilt by hand not machine and finally found this tutorial as a guide. 
 
I mostly used supplies I had on hand instead of buying all new quilt specific tools - I used an embroidery hoop instead of a quilt hoop and normal thread and needle for the basting.  I did buy hand quilting thread and needles for the swirling design.  I have tried using a thimble several times, but I find it to be more of a hassle than helpful.
 
I drew the swirling design freehand with a water soluble marker.  My favorite part was spraying down the quilt with water and watching the blue ink disappear.  Since my thread was the same color as the background of the fabric the quilting still looks subtle even with an intricate design.

I only quilted the background so the elephants stand our a bit because of the batting layer.

 
To be honest, I was going to ask my mom to do the binding for me.  It involves all the parts of sewing I don't like: measuring, ironing, being precise.  I ended up giving it a try on my own and I think it turned out okay.  It's a little wonky in places but that adds to the handmadeness, right?
 
A loves her special elephant quilt!

Saturday, August 1, 2015

Tree Stump Trampoline Steps

This project was at the top of my outside DIY list this summer:  figure out steps for our trampoline!
 
We've had our trampoline for a couple of years and have been using an $8 white plastic patio chair for the kids to get in and out of it.  Not only was it an eyesore in the backyard but really, really unsafe.  I was hoping we could build something cheap, safe and attractive instead of buying an aluminum ladder- I wanted something more substantial for the little kids to maneuver in and out of the trampoline.
 
Pinterest searches yielded zero inspiration so I started talking to my husband about designing and building a set of steps out of wood or metal (a husband who welds=incredibly helpful!) until I remembered the pile of wood sitting at the end of our street.  Our neighbor graciously let us take some pieces for free(!) for our project.  The tree stump trampoline steps were born.
 
We used two pieces of wood (and by we I mean my husband who did all the work, I didn't even lift a finger.  But I did come up with the idea!)  The larger diameter piece works as the middle step, then the smaller, taller stump was cut in half to form the first and third steps.  All the cuts were made with a chainsaw so the surface of the steps were very rough.  I thought we could just sand them smooth but the wood was just too uneven.  To avoid giving everyone splinters my husband "finished" tops of the steps with a fiberglass resin used on boats.  The steps are nice and smooth without being slippery when wet.  He also used a wood hardener (before the resin) that will hopefully prolong the life of the steps.  The sun is brutal on outdoor furniture and toys at this altitude!

Finally he set them in place in the backyard and used extra long lag screws to keep everything in place.  I love the turtle design that showed up on the smaller stump.


The kids use the edge of the trampoline for a handrail.  The steps are broad enough that no one is in danger of falling off.
 
With the wood hardener and resin the project turned out to be over my budget of $0, but I love the finished product.  Time for trampoline fun!

Friday, July 31, 2015

Kitty Cat Birthday Party {Teenage Billie Party}

One of my favorite things that has happened this first year with A home is celebrating her birthday with her!  Last year we ate cake and sang for her and she didn't even know we existed!  So this year we obviously had to have an extra special celebration.  I though about doing a big glitzy Indian/Bollywood party, but it didn't seem right for a three year old's birthday.  A LOVES animals especially kittens, so a kitty cat (pronounced billie in Hindi) theme was a no brainer.  The word for three in Hindi is teen- I've been joking that I now have a teenager (she's actually really good at acting like teen- lots of eye rolling!)  So this is my Teenage Billie Party!
 
Invites: I just printed these out on card stock from my home computer.  I didn't even find envelopes since I was just inviting family.  I wanted to keep a little Indian flair with this party so there was lots of gold and glitter, with pink and grey or chalkboard accents.
 
Take aways:  gold buckets with your own kitten.  The kids could name their cat and make a collar with a name tag and a bell.  These "cats" looked more scary than cute to me (you get what you pay for when it comes to plush animals.  I thinks these were less than a dollar a piece) but the kids all loved them.  M slept with his every night for a month!  There were cat stamps and stickers and pink polka dot party hats for taking home too.
 
Lots and lots of pink and gold...
 

Kitten popcorn
 
I had plans for a cat shaped cake, but ditched it at the last minute.  I think I'm finally coming to terms with the fact that I'm just not great with cakes.  Or maybe it just the frosting.  But probably both.  So I did a simple eight inch round cake.  I added raspberry sauce to the butter cream, which made it look like Pepto-Bismol, but it tasted good!  I made a quick cake topper bunting with paper straws, bakers twine, chalkboard stickers, and a gold paint pen.

Centerpiece: Yarn balls from my stash, lots of pink carnations, gold confetti, and gold jingle balls.


Kitty chalkboard art

Activities: I printed some kitty coloring pages from the Internet and put out crayons


Besides watching A eat her cake, this was my favorite part of the party.  I read that they do this in India on birthdays.  Pour confetti (I used glitter too) into a balloon before you blow it up.  After you blow it up, you pop it over the birthday girl's head so it rains confetti on her.  A was a little surprised at the popping of the balloon, but she loved her glitter shower!
 
Can't wait to celebrate so many more birthdays with this sweet girl!
 
Sources:
 
Gold buckets, plush kittens, cat stamps, cat stickers, pink popcorn boxes, square gold paper plates- Oriental Trading
Gold balloons, various ribbons, gold jingle bells, chalkboard stickers, chalkboard bunting kit, bamboo spoons- Hobby Lobby
Pink crepe paper, pink paper plates, gold star confetti, edible gold glitter (for cake)- Walmart
Gold stripe paper straws, crayons, gold glitter scalloped wall stickers- Target
 

Thursday, July 30, 2015

Peacock Birthday Party

This beautiful young lady is obsessed with peacocks so we had a glittery, feathery peacock birthday party last year.
 
 Chalkboard art for the party...
 
Invites:  D helped me stamp peacock feathers on a set of packaged cards.
 
I went to town with tableware and decorations in blues, greens, purples and gold.
 
Peacock blue Hawaiian Punch.
 
Even the veggies looked like a feathered friend.


Party games: Pin the Feather on the Peacock.  My talented mother whipped this up last minute for D's party.  Incredible!


D asked me to do a little mehndi as a party activity.  Probably not the best idea for this age group (six and seven year olds) as it was hard to stay still while the henna dried.  The girls all loved it, though, especially planning out their personal designs.
 
Take aways:  Peacock pails
 
Hand stamped M&M packs
 
 
and peacock masks!
 
Pretty peacock girls!
 
Sources:
 
Blue edged packaged cards: Michael's
Feather stamp, glitter "feather" picks: Hobby Lobby
Most paper tableware, BonBon nail polish: Walmart
Mehndi cones:  I got mine while we were in India last year.  You can find similar ones at Amazon like these
Gold cups, teal buckets, crayon pens, glitter notebooks, Mardi Gras masks: Oriental Trading
Special color M&Ms: Fuzziwig's Candy Factory
 
Related Posts Plugin for WordPress, Blogger...