Sunday, December 16, 2012

Felt Mushroom Tutorial

Here's a little tutorial for the felt mushrooms I made-
 
Supplies needed:
-large circle of red felt
-half of a Styrofoam ball
-cardboard circle, cut same diameter as Styrofoam ball
(I used a floral foam ball because that's what I had on hand- a regular Styrofoam ball is the way to go for this project, though, I think)
-circle of brown felt, slightly smaller than cardboard circle
-long rectangle of cream felt
-small circle of cream felt
-handful of small cream felt circles in various sizes
-fiberfill
-glass stones, beans, lentils, or something heavy
-tacky glue
-embroidery floss
-needle
 
To start, stitch a running stitch halfway around the red felt circle.  I used very small stitches- larger stitches make the felt lumpy after you gather the felt around the Styrofoam. 

 Once you have stitched about halfway, place the Styrofoam ball and cardboard circle in the middle of the red felt.  Start to cinch the felt around the ball by pulling on the thread.
 
 Once you have stitched all the way around the red felt circle pull the thread very tight and tie off.  You might need to adjust the felt a bit to get it to lie as flat as possible.
 
 It should look like this when you are done.
 
To make the base: sew the short ends of the cream felt rectangle together forming a tube.  Sew the small cream circle onto one end of the tube forming a cylinder.  I used my machine for this part, but you could stitch it by hand if you wanted to.
 
 Turn the base out so the seems are facing inside.  Fill with fiberfill and something heavy.  Beans or lentils would work well for this- I used glass stones because I had them on hand.

 Attach the cream base to the center of the brown felt circle.  I used embroidery floss and a blanket stitch to do it by hand, gathering the cream felt slightly.
 
From the top it will look like this.
 

And when finished it will look like this.
 
 Now attach the base to the rounded red top at the edge of the brown felt circle.  Again I used a blanket stitch with fairly small stitches.
 
 After you are done attaching the base it should look like this.

 Now glue the small cream circles onto the top of the mushroom.  You could sew these onto, too, if you wanted them to be really stable, before you start gathering the red circle.
 
 When the glue is dry your little mushroom done!
 
These little mushrooms live under our woodland theme Jesse Trees this Christmas.  Where are your mushrooms growing?

Ninjago Party

I know I say this for every kids' party we throw, but this one might be my favorite!  For his seventh birthday my oldest's request was Ninjago.  We invited his friends to come to our dojo to complete their ninja training in order to unlock their full potential. 
 
For decor: HB banner using Asian themed scrapbook paper and white card stock.  I used the Karate font and Chinese Takeaway font for all my projects for this party.  Lots of crepe paper streamers and balloons in colors for the four original Ninjago ninjas; red, blue, white and black.  I made large and mini Chinese lanterns from colored card stock in the Ninjago colors and hung them everywhere.
My family lived in east Asia when I was young, so I pulled some Asian treasures from my childhood to finish the decorations.  I used these stone chess pieces as a centerpiece to play the part of our stone army.
 
This was my favorite part of the party- ninja training!
My husband took this and really ran with it.  He set up the dojo in our garage since we didn't know what the weather would be like.  To set the scene he hung big piece of butcher paper spray painted with Chinese characters from the ceiling.  I knew his Chinese/English dictionary would come in handy someday (and yes, I know ninjas are Japanese, but we were working with what we had.)
To complete their training the kids had to crawl through a fridge box full of balloons, walk across a balance board, kick down boxes covered with pictures of ninja enemies, use their paper throwing stars to hit balloons off Pringles cans, climb through a hula-hoop hanging from the ceiling, punch Garmadon's face pasted on a punching bag, knock down plastic bottles with foam sword, use chopsticks to move serpentine (gummy worms) from one bowl to another, and finally cut through a butcher paper banner with their foam swords. Whew!  The kids loved it!  My husband even dresses up as Sensei and timed them.
 
After training the ninjas got to wail on the Garmadon pinata...
I made another balloon/paper mache pinata and added cardboard for the accents.  Instead of covering it with crepe paper, I painted it.  I filled it with fruit snacks, little green army guys, and these Japanese rice candies (found at Walmart in the Asian food section.)  I made the paper mache part fairly thick to stand up to seven year old boys smacking it- it lasted just long enough for every kids to get one whack.  The rice candy was deemed "gross" by all the kids, though.  So much for cultural accuracy!
 
My son requested a ninja shaped cake that I knew I couldn't pull off.  Maybe for our next ninja party?  For the party with friends I made regular cupcakes and used these toppers from Craft, Interrupted.  For our family party I made a layer cake and topped it with M&M's and Ninjago mini figures.
I kept food simple at the kids' party with pizza and fruit, but for our family party we went all out with potstickers (my son's favorite!), egg rolls, and lots of stir fry.  We did have "ninjade" for the kids, inspired by this party.
 
For the take home goody bags I made take out boxes from card stock and glued Ninjago eyes in coordinating colors.  Even with lots of tweaking my boxes came out pretty crooked, so I won't bother linking to the pattern I used.  I filled the boxes with a Lego mini figure and a bag of M&M's in coordinating colors (I got my bulk candy locally at Fuzziwigs.) 
The kids also got to take home their ninja headbands (idea also from Craft, Interupted), their decorated paper throwing stars (instructions found here- I got really good at making these!), and the foam swords.
 
To round out the activities the kids watched an episode of Ninjago and played Speed Slice on the Wii.  All ninjas left having reached their full potential!


Saturday, December 15, 2012

Jesse Tree cont.

So here is my Jesse tree setup.  Actually I used three little trees that I picked up from my mom in her massive Christmas decor downsizing.  I think she got them from Hobby Lobby.
As you can see I put a bit of a woodland theme spin on it.  The felt mushrooms were a quick addition...
This is a reindeer my husband made when he was kid- he never wants to pull it out with the Christmas decorations, but I think he is super cute.  So he is living in our little woodland tableau...
 Each Jesse tree ornament is wrapped in it's own lidded box.  I wrapped the lid and the bottom separately so the kids don't actually unwrap any of the boxes, they just slip off the ribbon and open the box.  That way we can reuse all the boxes again next year. 


We've been reading from the Jesus Storybook Bible for as many of the ornaments as we can. 
Here's the list of the readings we are using:
Day 1: World - "The beginning" p. 18
Day 2: Apple & snake - "The horrible lie" p. 28
Day 3: Arc & rainbow - "A new beginning" p.38
Day 4: Camel & tent - "Son of laughter" p. 56
Day 5: Lamb - "The present" p. 62
Day 7: Colorful coat - "The forgiving prince" p. 76
Day 8: Ten Commandments - "Ten way to be perfect" p. 100
Day 11: Slingshot - "The young hero and the horrible giant" p.122
Day 15: Crown & dove - "Operation 'No More Tears'" p. 144
Day16: Sheppard crook - "The Good Sheppard" p. 130
Day 17: The Cross - "Operation 'No More Tears'" p. 144
Day 20: Fiery furnace - "Daniel and the scary sleepover" p. 152
Day 21: Brick wall - "Get ready!" p. 170
Day 24: Angel - "The Light of the whole world" p. 184
Day 25: Nativity - "He's here!" p. 176


Tuesday, December 4, 2012

Felt Jesse Tree Ornaments Continued

So here are the rest of my Jesse Tree ornaments.  Overall I like the way they turned out, though there are a couple I might change out in years to come.  For now these will do just fine.  I've included verses to read with each ornament that I have found online.  I haven't read through each day's verses yet, so I don't know if we will follow these verses exactly.  For example last night was day three for us, Noah's arc and the rainbow.  We read the story of the arc from our Jesus Storybook Bible instead of regular scripture.  I think I'll try to use that version when we can for better understanding.
Still to come... our Jesse Tree(s) setup- trees, boxes, etc.
 
 Day 7: Coat of Many Colors - symbolizes Joseph - read Genesis 37:3-4, 12-24, 28
 Day 8: The Ten Commandments - symbolizes Moses - read Deuteronomy 5:1-22
 Day 9: Grapes - symbolizes the Promised Land/Canaan - read Genesis 17:7-8, Numbers 13:1-2, 17-18, 20, 23, 27
 Day 10: Sheaf of wheat - symbolizes Ruth - read Ruth 1:15-2:3
 Day 11: Slingshot - symbolizes David - read 1Samuel 16:14-23; 17:12-51
Day 12: Scroll - symbolizes God's forgotten scroll - read 2Kings 22:2, 23:1-3
 Day 13: Stump - symbolizes shoot from Jesse - read Isaiah 11:6-10 
Day 14: The Lion and the Lamb - symbolizes the New Creation - read Isaiah 11:6-10 
 Day 15: Crown - symbolizes Prince of Peace - read Isaiah 9:2, 6-7
 Day 16: Shepard's crook - The Good Shepard - read Ezekial 34:2b, 4-5, 10-12, 15a, 16a, 23-24
Day 17: The Cross - symbolizes the Suffering Servant - read Isaiah 53:4-7, 9, 12b
 Day 18: Heart - symbolizes The New Covenant - read Jeremiah 31:31-33, Hebrews 9:13-15
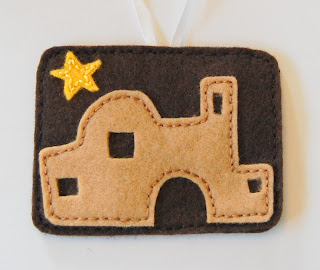
Day 19: City - symbolizes Bethlehem - read Micah 5:1-5a, Luke 2:4-7
Day 20: the Firey Furnace - symbolizes exile and persecution - read 2Kings 17:23, Daniel 3:19, 21, 28
Day 21: Brick Wall - symbolizes return to Jerusalem/ prep for Messiah - read Nehemiah 1:3, 2:18, 6:15-16, Revelation 21:10-14
Day 22: Star- symbolizes Jesus/ star that lead the Magi - read Numbers 24:17-19a, Matthew 2:1-6, 9-11
Day 23: Candle - symbolizes the Light of the World - read Psalm 27:1-3, John 1:9, 8:12
Day 24: Angle - proclaimed miraculous birth - read Matthew 1:20-25, Luke 1:26-38, 
 Day 25: The Nativity - symbolizes the birth of Christ - read Luke 2: 1-21
Related Posts Plugin for WordPress, Blogger...